Face Painting a Monster High Doll
Part One
The first step is to wrap up the hair of your doll in plastic wrap. This will protect the hair from paint and also keep the hair out of your paint. Some people paint the face first, and then do the hair. For myself, this always wound up in a disaster- where I would somehow spoil the face paint. To avoid such future tear inducing events, I decided : root the hair first.
You can do this in whatever order you like. This is how I do it.
Blushing and Tinting
I use 2 different brushes for this- and that is all they are used for. One is a flat and one is a round. Both are synthetic and will stand up to the abuse of the emery board.
I use an old emery board and chalk pastels for my blushing and tinting. They give a nice soft appearance.
Rub the pastels on the emery board to break them down to a fine powder.
Pastels take practice. Start slowly with your colors- especially strong colors like red. I mix my red with the peach before I apply it. Mixing takes place on the emery board.
Once you have some color on your flat brush tip, ponce the area you want colored. Do not 'paint' with this brush, ponce it straight on. Stop to blow off the excess from time to time to see if the color you want you are getting.
Next, I tint around the eyes. For Candy, I am doing a very simple tint job- because I know how I want her to look. Using the round brush, I dip it in the blues- first the light, then the dark- and again, I ponce on the pastel. I do this until I am satisfied with how it looks.
This is a very subtle look.
>>>If you want your look to be bolder, you would ponce with a piece of cosmetic sponge and paint for the desired effect.
This head has been painted a white with automotive interior fabric and vinyl spray paint. I do not want her face looking too bright. I want it to look like a powdered lady from the 1500's with my own spin.
The head was glossy from the spray paint. After I have completed the blushing and tinting I spray the face with a flat sealer. You can use Mr.Super Clear flat, and I would recommend it for eveything else- but in this case, I used Krylon flat sealer meant for art pieces. I knew it would work with this paint -- otherwise, Mr.Super Clear Flat. See how soft the face looks above.
Now I am going to start on the eyes and lips and eyebrows. I use Liquitex Slow-Dri medium. It causes the paint to puddle evenly, and dries slowly enough to correct mistakes.
Okay, that is a messy looking palette to be sure. I use ceramic plates from the 99 cent store. They make the best palettes for acrylics -- in my opinion. This one needs a soak- but do read the tips section at the end of this post before you clean your palette (should you decide to adopt this method). The brush is a 10/0 short liner brush. It is not new, but is in good condition because I take very good care of it.
On the palette you can see a small bit of blue and some medium next to it. I will mix these 1/1.
I want her eyes to be blue, and have started with a blue that will be somewhere in the middle of the lightest blue I will use, and the darkest blue. I have decided on somewhat side glancing eyes.
Before you paint the eyes, look at your own eyes, look at the eyes of people in magazines. What do you like about them? What don't you like about them? Think about what kind of eye you want for your creation. Think about the expression too.
First pass at the lips and eyebrows. I gave the lips a wash of rose red color- the red was mixed way down to a tint with the medium- the eyebrows are the same color. One eyebrow is slightly up from the other- her expression is starting to be put in place.
After her eyes and lips dried, I went back in and painted her eyebrows and lips a bit darker. I also added pink in the corners of the eyes and on the underside. I am not trying to make these perfect- our faces are not perfection. Also, there will be other paint going over the top of what is there.
I also added color to her eyes. I dabbed in a dark ultramarine blue on top of the medium blue. I put it in like a tint- using very little color -- repainting on top of that until I got the desired effect.
Next is the first coat of Sakura Crystal. I buy mine on ebay from moorezmore. A little goes a long way.
Sakura crystal will give her eyes depth. If I mess up around the edges, I go back in and clean that up with a clean brush and water. I have one brush I use just for the Sakura. It is always clean and ready.
The Sakura crystal has dried, so I put in the pupils. I tend to prefer larger pupils- you might like smaller ones. The nice thing about the crystal- if you paint on it- and see it is not what you want- you can remove the paint easily and start over. It provides a very slick surface. I like to puddle the pupils- there is a lot of paint there. Once it is dry, another coat of the crystal will be applied.
I will continue to layer the eyes with color and crystal until I am happy with the results.
If for some reason things go very wrong for you- you can remove this with the acetone and swabs.
Building the Sakura Crystal up in layers along with the paint gives the eye a lot of depth. They appear to be more like real eyes because they have that shine.
When you paint faces, remember that there are many things that combine to make a face look a particular way. Look at the photos below and notice the eyes, the eyebrows and the look. What expression do you see?
Over the years eyebrows have been shaped by the fashion of the day- and usually by whatever stars or celebrities were popular- thus making their "look" popular. Spend some time looking at magazines like Marie Claire and Vogue. Those are my 2 guilty pleasures if I have to give up everything else. If someone asks me what I want for my birthday- I will ask for an extension on my subscription to one of them. If you enjoy fashion, they are great to have around.
Whatever inspires you and feeds you is important. Maybe you have a favorite shop you like to visit, or you are a Project Runway fan. Do. Go. And do some more.
I have started to darken the outer edge of each iris with dark blue mixed with black and painting medium.
Beginning the eyelids. I start with a small lid, and decide how large to make it as I add more width, a bit at a time.
The eyelids are now the size and shape I want. I have painted them with a mid-range color. I will add darks and lights to them later.
The next color I start to add is burnt sienna. Under the eyes, and around the lids, with a trace bit on the lids. It is a warm color that adds the right amount of contrast. I have also added that color as a soft tint on top of the pink eyebrows. It makes them more 'there', while retaining the 'pinkiness' I want. Every little stroke is put on to draw out the face I see in my mind. If I am very lucky, she will emerge.
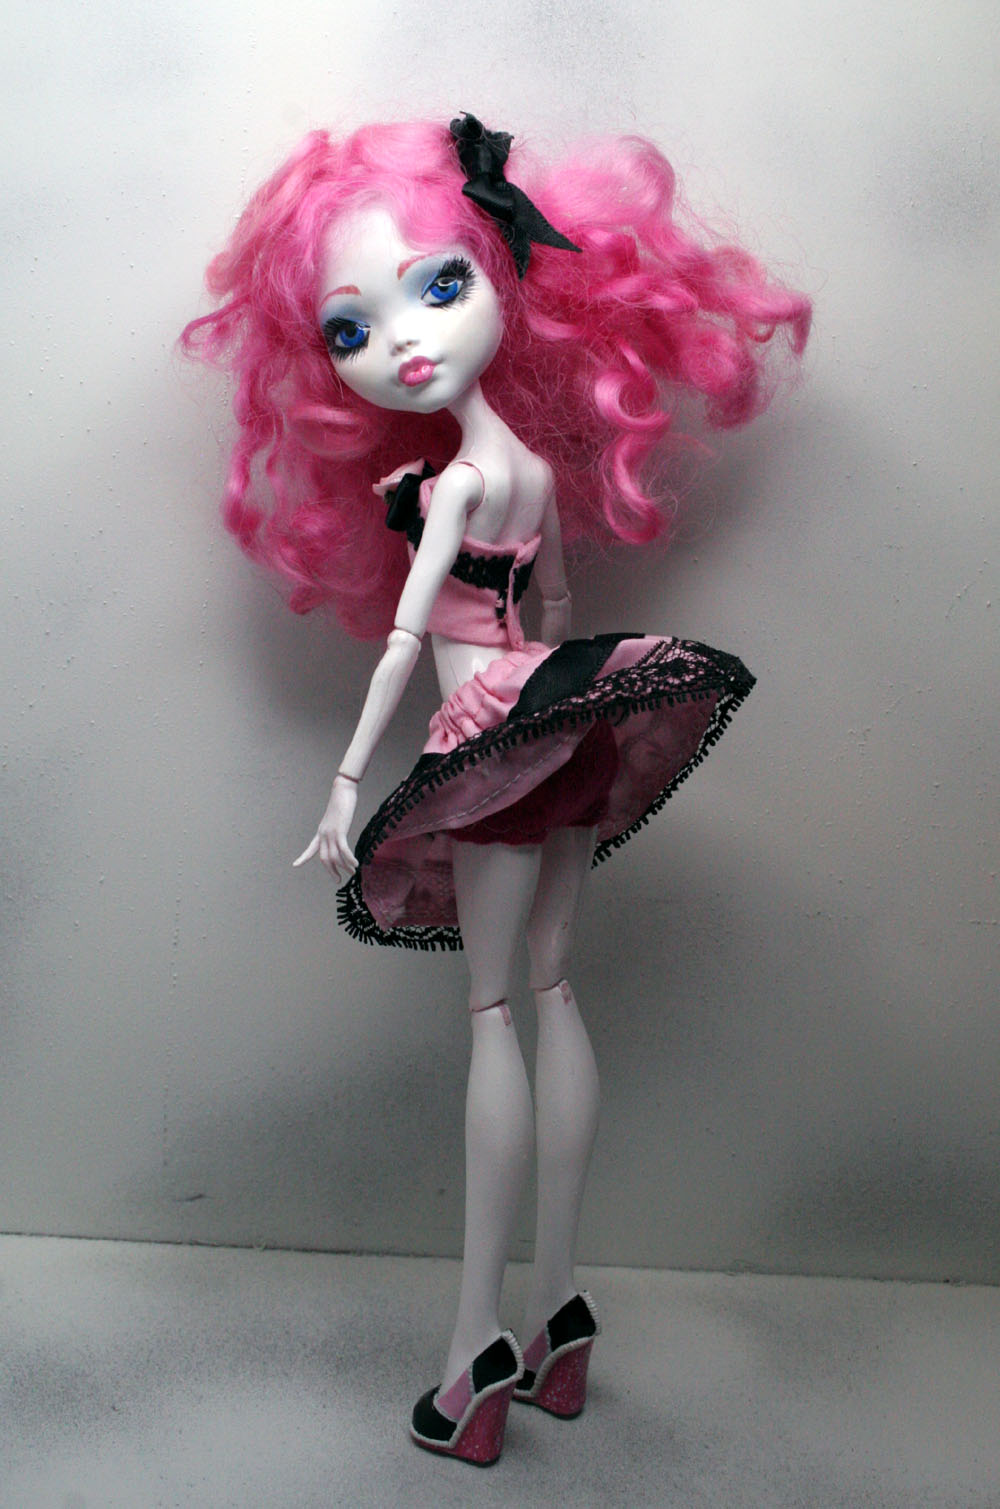
Candy's body has been blushed and sealed. It was time to return her head to her body.
She will be set aside for a day. I do this so that I will see her with fresh eyes on the following day. If she needs anything big changed, or just something small, I will be more likely to see it.
So far, she has gone from this:
To This:
Part Two will follow in a few days.
*Don't forget, we are having our June Drawing for Monster High jeans from Dolly Dolly Fashions!
Read the June 2012 Drawing Post for the Rules.
TIPS:
1. Be clean- make sure your hands are clean and your workspace is clean. Long hair? Put it up.
2. Never let the paint on your brush go more than halfway up the bristles. Rinse your brush often. If the paint gets into the ferrule of the brush, it is not past redemption...but it is pretty much messed up.
Mix small amounts of colors in plastic bottle caps using a flat toothpick or an old small brush. Do not use your good brushes to mix up paint.
3. Clean your brushes well and you will have them for a long time. Use soap and water for acrylics. Using only water will not get them clean enough. Paint will build up over time in little places.
Clean your ceramic plate by soaking it in water in the sink. Put a paper towel over the drain before you do this. As you rinse off the soaked plate, the bits and pieces that come off could be hard on your plumbing- the paper towel catches those pieces and you can pitch it in the trash- no plumber needed.
4. If your brushes get messed up, soak them in 100% Rubbing Alcohol for a few hours, then swish them around in the alcohol. Wash with soap and water. This works with acrylics and oil paints. I use a glass jar and plastic wrap.
5. Plan.
This sounds simple- but it will save you time and those moments you wish had not happened.
If you are painting your doll- get everything out. Paint, brushes, paper towels, and anything else you think you may need. Do you use tissues to wipe away extra paint? Have a few on your table already.
6. Make sure you have enough time- never rush anything. If you rush, you will make a mistake- then you will spend time undoing that mistake and re-doing what you hurried to finish in the first place.
7. Let it dry. (paint, glue, sealer) Don't mess. Walk away. Sounds easy- but its not. If you are a person who has to be busy- have something else handy you can do while waiting. Do not touch it.
8. A little humbleness goes a long way.
If someone tells you there is only one way to do something- it is okay to think otherwise. After you have tried it their way- try it your way. You may discover a better way- for you. Often one thing is not better than another- it is only that it is easier for that person to do it this way, and for this person to do it that way. Judging and snootiness will land one in the mud. Every time.
9. Rarely is anything ever truly ruined. Almost every mistake you make while working on something can be fixed- one way or another. I saw a tattoo artist once that fixed bad tattoos. He tattooed over the old tattoos- and what he created was beautiful beyond words. He had vision.
10. Honor your vision.