As promised, here is the tutorial for making some small things for our small dolls.
Sneek Peek
Supply List :
Plain Paper and Presentation Paper or thin Card Stock
Ruler
Scissors and Exacto Knife
White Glue that dries clear
Sand Paper or Sanding Block
Round Tooth Picks
Match Book
Colored Pencils and Colored Markers
Acrylic Paints
1 Flat Brush and 1 small Round Brush
Stapler
Tissue - as in Kleenex
Start by printing out the templates for the food carton and the tissue box.
I used glossy presentation paper. You can print the templates on whatever suits you- but it needs to be heavier than plain copier paper. After you have printed it, get out your markers or pencils and draw your designs on the box.
Get the Templates Here:
Cut out box. I used both scissors and an Exacto knife.
Fold all of the lines.
Glue the side tabs on the inside of the carton. I use a bottle cap to hold the glue- and I use a slick piece of cardboard to apply the glue. You can use tooth picks to do this as well.
After it is glued, it should look like this.
Get out 2 tooth picks- the round variety. The ones in the photo are made from bamboo and have decorative ends. You don't need these- use what you have. These just happen to be what is in our beverage cabinet. Cut or break the tooth picks in half and sand the ends.
Chop Sticks
You can make noodles for the inside with air dry clay or sculpy. I will not be doing that here- too many other things to add to this post.
Trim and sand the lower portion of the tooth pick pieces.
Use colored markers to make these into colored pencils.

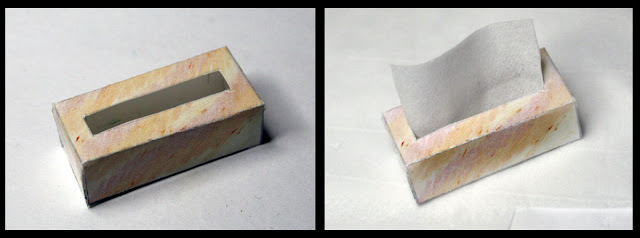
Tissue Box
Start by coloring the box. I used colored pencils, but you can use markers for a brighter look.
Cut out the box. I used an Exacto knife to cut out the top opening.
Fold the piece on all of the lines. Then glue each end piece and finish with the bottom.
Once your piece is glued and dried, cut a piece of tissue slightly larger than the opening and put inside as shown.
Book
Open your match book and cut off the matches. Your book cover will be uneven.
Using your ruler, measure the shorter side and then mark the longer side so they will be the same. Cut off the extra.
This match book measures 2.75 inches across. I am going to cut the plain paper pieces to be 2.25 or 2 1/4 inches across. I will also cut the pieces to be shorter than the measurement from top to bottom.
There are 18 cut pages. Gather them into piles of 3 each as seen in the photo.
Straighten them and then fold each group of 3 in half. These are called signatures in the book world. You should have 6 signatures in all.
Get your stapler and staple the signatures in the middle. If you do not have a stapler, or want to be more authentic, you can use a needle and thread and sew them together in the middle.
You should now have 6 stapled or sewn signatures.
Next step is to glue one signature to another, until all are glued together. Glue is placed only along the edge as seen in the above photo.
After they are glued together and dry, you can paint the edges if you like. I decided to paint mine gold. You can use red or another color- and you can also use colored markers for this. I chose to paint mine.
You can decorate your cover any way you like. Here I decided to use the gold paint and a flat bristle brush. I painted in one direction leaving lines in the paint. After it dried, I painted in the opposite direction. This gives a textured effect that looks like book binding fabric.
After the outside was dry, I used a red marker around the inside and then covered that with a light coat of the gold paint.
Cut a piece of paper that will wrap the back and part of the sides of your pages.
Put glue on the back, and press the paper with your fingers - let it dry.
Next glue the flaps.
When it is dry, it will look like this.
I painted the cover and the spine with black acrylic paint and a small round brush.
Now you have a scene for your dolls. Frankie is watching a movie and having some take out food. What will your dolls be doing?
I hope you will make some things for dolls and that you have enjoyed this tutorial :)
Cheers, PB


Grest tutorials. These will certenlt come in handy. I liked the take out box and the book especially.
ReplyDeleteThanks Cody :) I had fun making them.
ReplyDeleteThose are great! Thanks for sharing! Especially love the books! Have a great day and I hope all is well with ya!
ReplyDeleteThanks Reece :)
ReplyDeleteThis is such an awesome tutorial! You're so creative :D
ReplyDeleteThanks Jen :)
DeleteI would like to see more custom dolls. Tell me, what was slowing u down?
ReplyDeleteThis tutorial was very fun and creative by the way! My dolls luv their Chinese take out and one has a cold so, the tissue box was very helpful!
Life and a death in the family has slowed me way down. Doing this kind of post for the blog can take 2 to 3 days- time I do not have right now.
DeleteOk... I would like 2 see some more dolls! Theyre to pretty!
Delete